A First Table at a Creative Fair
Prepare a first table at a creative fair with a focused selection, clear prices and a layout visitors can grasp at a glance.
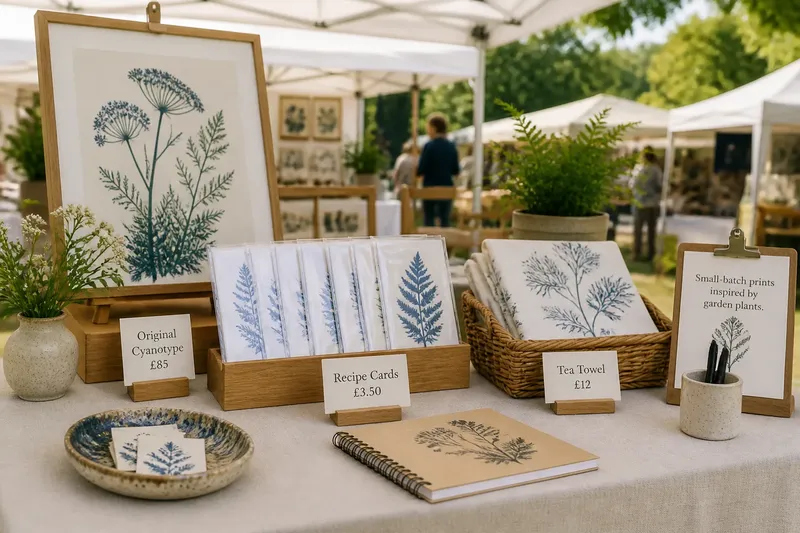
The most common mistake at a first creative fair is bringing everything you have made; the table becomes a storage shelf, and visitors have to work to discover what belongs together. A first table at a creative fair works harder when each object earns its place and the arrangement makes the connection visible before you say a word.
Use the week before the event to make decisions in a calm order: choose a small body of work, check that it can travel and stand securely, then arrange it at home as if the fair had already opened. The aim is not to imitate a shop. It is to give a passer-by a quick, inviting way into the work.
Seven days out, choose the story the table can tell
Lay your possible work on a clear surface and group it by the feature a visitor will notice first: colour, material, subject, use or scale. A set of hand-printed cards and a few matching notebooks may read as one family. A ceramic bowl beside an unrelated portrait series may not, even if both came from the same studio.
Choose a lead piece, a supporting group and one or two smaller or lower-commitment items if you have them. The lead piece should be easy to see from a short distance; the supporting work should deepen its appeal rather than compete with it. Leave out anything that needs a long explanation before a visitor can understand why it is on the table.
Now ask three practical questions of each candidate:
- Can someone tell what it is without picking it up?
- Does it belong beside the lead piece through a visible link?
- Can I show it safely and comfortably in the space I have?
If an item fails the first two questions, save it for another occasion or show it as a small, clearly separate group. A fair is not an inventory audit. A few well-related objects can make a stronger impression than a crowded survey of every direction your practice has taken.
Six days out, decide what a visitor should notice first
Write a plain-language sentence for yourself: “This table is about…” Keep it concrete. “Small-batch cyanotype prints of garden plants” gives you a useful selection test; “creative things I like making” does not. You do not need to print this sentence on a sign. It is a quiet guide for choosing what goes where.
Put the lead piece where it can be seen without a visitor reaching across other work. Group related items close enough to feel connected, but leave breathing room around their edges. A stack of prints can sit beside a sample on a display stand; a line of small objects can be spaced so that each shape remains legible. Consider the view from the aisle, not only the view from your side of the table.
Imagine you make illustrated recipe cards and bring a small run of cards, a matching tea towel and a few framed originals. At home, you place one framed original upright at the back, fan a few cards in front of it and fold the towel so its printed motif faces out. The expected observable result is a clear visual link among the three formats, while a visitor can still pick up a card without disturbing the display.
Five days out, gather the table kit
Make a list based on the venue information and your chosen work, rather than packing a general-purpose box of props. A useful kit may include:
- A plain cloth that fits the table and does not compete with the work.
- Stands, blocks or display clips suited to the objects you plan to show.
- Price cards that are readable from the visitor’s side.
- Packaging that protects each item and is simple to hand over.
- A small notebook and pen for requests, questions or details to follow up.
- Tape, scissors and a few spare labels for minor display adjustments.
- A bag or box for stock kept out of view, so the tabletop stays composed.
Keep the tools proportionate. A printed banner, elaborate risers or a custom-built display may be unnecessary if a clean cloth, a few sturdy stands and legible cards already do the job. Before buying anything, see what you can borrow or adapt from home; the important test is whether it supports the work without drawing attention to itself.
Four days out, make the practical details easy
Check the organiser’s instructions for table dimensions, arrival time, access, display restrictions and what is provided. Make a simple list of what must travel with you and what can be set aside. Pack the work so that the first items out of the box are the pieces needed to establish the main arrangement.
Prepare labels with the object’s name or type, its price and any brief material or care detail a buyer may need. Use a consistent format so the table feels considered. If an item is not for sale, say so clearly rather than leaving a visitor to guess. If you take card payments, make sure your chosen payment method and any backup plan suit the venue and your own circumstances.
Prices should be easy to find without turning the table into a wall of text. A small card beside a group can work better than a separate label on every piece, provided visitors can tell which price belongs to which item. Keep packaging accessible to you but out of the main display, and decide where completed purchases will go.
Three days out, rehearse the arrangement at home
Clear a surface about the size of your allotted space, then set out the cloth, display supports, signs and chosen work. Use a phone photograph from the front as a quick check: are the lead pieces visible, do the groups make sense, and can the price cards be read? Take another look from a slight angle, as visitors rarely approach in a perfectly straight line.
Try reaching for each item as if you were serving someone across the table. If you have to move three other objects first, change the layout. Keep fragile work away from the edge and avoid tall displays that hide smaller pieces behind them. A display should invite browsing without creating a puzzle or a risk of knocking things over.
Make one adjustment at a time. Removing an object may improve the whole table more than adding a decorative prop. Once the arrangement feels clear, photograph it and pack the pieces in the order you expect to set them out. The picture is a reference, not a rule: a different table or a busy aisle may call for a small change on the day.
One day out, prepare for conversation and change
Think of a short, natural way to describe the work when someone stops. Name what it is and one detail that helps them look more closely: the printing method, the source of a pattern or the way a piece is used. Then leave space for the visitor to respond. A table is a meeting point, not a stage for a memorised speech.
Prepare for ordinary changes without trying to predict every outcome. Keep a few spare price cards, a cloth for dust, and a place for stock that is not on display. If an item sells, tidy the space rather than rushing to fill every gap; the remaining work may read more clearly with a little extra room. If people pause but seem unsure where to begin, make the lead piece easier to see or move its label into view.
Pack your essentials together and put the organiser’s contact details, travel information and any required documents somewhere easy to reach. Follow the venue’s instructions for arrival and set-up. Requirements can differ by fair, so rely on the organiser’s directions and any relevant product or manufacturer guidance where applicable.
What should a first fair table answer?
How many different things should I bring?
Bring enough to show a considered range, but choose by relationship rather than by trying to fill every inch. A visitor should be able to see which pieces belong together and how they differ.
Should every item have its own price card?
Not necessarily. A clearly placed card can cover a group when the prices are unmistakably matched to the items; use individual labels if that would prevent confusion.
What if my work does not look like a matching set?
Look for a link visitors can see, such as a shared material, subject or way of making. If no clear link exists, show a focused subset rather than asking one table to explain several unrelated bodies of work.
What should I say when someone stops?
Offer a brief description and a detail they can use to explore the work, then let them look. A warm greeting and a little room to browse are often more useful than a long pitch.
On the day, let the display do its quiet work
Arrive with enough time to set out the table without rushing. Use the photograph as a starting point, then check the view from the aisle and make sure the work, prices and any “not for sale” note are visible. Stand back once the boxes are gone. If the table still makes sense from a few paces away, its first job is done.
As visitors handle pieces, return them to their group and keep the front edge clear. Notice where people pause or hesitate; that can show you whether a label is hard to spot or a display support blocks a view. Make small, practical adjustments rather than rebuilding the whole arrangement in response to every passing moment.
For a first table at a creative fair, the best preparation is not a bigger stockpile or a more elaborate backdrop. It is a selection with a visible thread, a layout that respects how people look and reach, and enough organisation that you can meet visitors without rummaging for a price or a bag. When you pack up, jot down which display choices felt clear and which questions came up; those observations can guide the next fair without dictating what your work must become.